
How-To: Painting Stripes
My interest in painting stripes on a wall started many years ago during my freshman year of college. My parents moved into a new house and since they were never planning on me moving back home, I was assigned the smallest bedroom to stay in during my summers. My previous rooms growing up, I had also chosen bright colors on the wall or stenciled neon colored bricks (I know it sounds beautiful doesn't it?) so I thought that while I wanted to go neutral, I still wanted to do something to the walls that was a little different. Stripes were the perfect solution! The first time around I decided vertical stripes would be best in lilac. Looking back, I am not really sure why I considered two shades of purple to be "neutral" but remember I was coming from neon stenciled bricks. So my first experiment of stripes went up. I can't find a pic while I was living there but I did scrounge up this one that I was posing in my old room with my wedding dress. I believe that was the day that the veil came in so I wanted to try to entire ensemble. But ignore me...look at the stripes.
 No one liked them as they were compared to a circus tent and a nursery by my siblings. Sadly the lilac stripes were painted over last year who did not want them in her new office.
But I was not discouraged. Stripes Round #2 were the third repaint in the master bedroom at our old house-


This time I really liked how they turned out and my siblings grudgingly did as well.
So when it came time to do the craft room, my mind immediately went to stripes again because our current house was currently stripe-less. This time I did not have to make it neutral since it was my fun room, but I did want to go with horizontal stripes to avoid the circus tent look. Since it was my third time with stripes, I thought I would share the knowledge of how to make the go as smoothly as possible with the least amount of paint.
Materials:
Paint (in the craft room I used one gallon of each color)
Frog tape
Tape measure
Ruler
Pencil
Laser Level (must have for stripes)
Paint roller and brush
Steps:
1. Prep your walls. In the craft room this involved filling thousands of tiny holes since they hung everything with straight pins. Also at some point a wall paper border around the middle of the room messed up the wall. Instead of repairing it, the previous owners just painted over it. So I had to even it all out and then prime all the places I patched.
2. Decide how many stripes you want and if you want them all the same size. Measure your wall from ceiling to floor board and divide by the number of stripes. Mark the wall with small pieces of painter's tape on the inner "sides" of the stripes. For example, if your stripes are going to be 12 inches, measure 13 inches from the ceiling and place the top of the tape there. Then measure 11 inches from the top of that tape and place the bottom of the tape at that spot. Repeat for all the stripes. Next, mark which side will be the stripe.


3. Using the tape as guides, paint the lighter color in between them. This does not have to be perfect, just eyeball it. After the first coat is dry, add a second coat.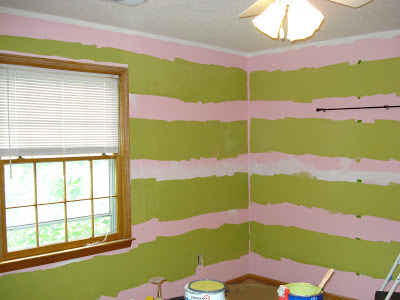
4. Now for the fun part. Measure each stripe on a wall. And then measure it again. After that measure one more time. The bust out the tape and the laser level. Taping is a two person job.....one person needs to hold the level while the other tapes. When you tape, even if you want even stripes, the tape will not look even because you need to account for the width of the tape. After you get one wall taped, measure again. There is nothing like the feeling of getting to the fifth wall and realize you had mismeasured. Not that ever happened to me:).
When you do stripes you will realize that your walls and ceilings are not straight. This was especially true in our old house. So you have to walk the fine line of making it really level and making "look" level in relation to the wall or ceiling. We have done it both ways depending our how off we were.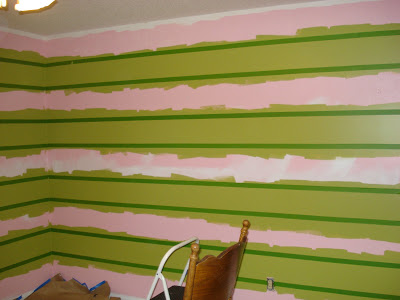 5. After all the tape is up, run over it with a plastic putty knife or old credit card to really seal the tape to the wall.
6. Paint two coats of the darker color. While the second coat is still wet, pull the tape.
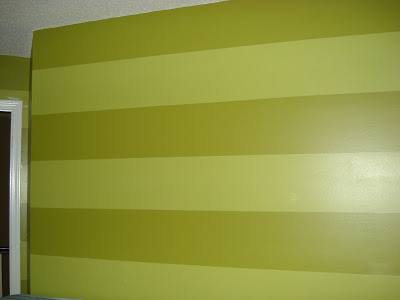
 7. Touch-up any paint that seeped under the stripes.
Tah-dah!
No one liked them as they were compared to a circus tent and a nursery by my siblings. Sadly the lilac stripes were painted over last year who did not want them in her new office.But I was not discouraged. Stripes Round #2 were the third repaint in the master bedroom at our old house-
This time I really liked how they turned out and my siblings grudgingly did as well.
So when it came time to do the craft room, my mind immediately went to stripes again because our current house was currently stripe-less. This time I did not have to make it neutral since it was my fun room, but I did want to go with horizontal stripes to avoid the circus tent look. Since it was my third time with stripes, I thought I would share the knowledge of how to make the go as smoothly as possible with the least amount of paint.
Materials:
Paint (in the craft room I used one gallon of each color)
Frog tape
Tape measure
Ruler
Pencil
Laser Level (must have for stripes)
Paint roller and brush
Steps:
1. Prep your walls. In the craft room this involved filling thousands of tiny holes since they hung everything with straight pins. Also at some point a wall paper border around the middle of the room messed up the wall. Instead of repairing it, the previous owners just painted over it. So I had to even it all out and then prime all the places I patched.
2. Decide how many stripes you want and if you want them all the same size. Measure your wall from ceiling to floor board and divide by the number of stripes. Mark the wall with small pieces of painter's tape on the inner "sides" of the stripes. For example, if your stripes are going to be 12 inches, measure 13 inches from the ceiling and place the top of the tape there. Then measure 11 inches from the top of that tape and place the bottom of the tape at that spot. Repeat for all the stripes. Next, mark which side will be the stripe.
3. Using the tape as guides, paint the lighter color in between them. This does not have to be perfect, just eyeball it. After the first coat is dry, add a second coat.
4. Now for the fun part. Measure each stripe on a wall. And then measure it again. After that measure one more time. The bust out the tape and the laser level. Taping is a two person job.....one person needs to hold the level while the other tapes. When you tape, even if you want even stripes, the tape will not look even because you need to account for the width of the tape. After you get one wall taped, measure again. There is nothing like the feeling of getting to the fifth wall and realize you had mismeasured. Not that ever happened to me:).
When you do stripes you will realize that your walls and ceilings are not straight. This was especially true in our old house. So you have to walk the fine line of making it really level and making "look" level in relation to the wall or ceiling. We have done it both ways depending our how off we were.
5. After all the tape is up, run over it with a plastic putty knife or old credit card to really seal the tape to the wall.6. Paint two coats of the darker color. While the second coat is still wet, pull the tape.
7. Touch-up any paint that seeped under the stripes. Tah-dah!